FAQ Catagories Home
HEL Performance
From time to time we are asked why certain brake line kits for motorcycles with ABS are more expensive at first glance than those from some other suppliers.
One explanation for this could be that there are different approaches to replacing rubber lines with steel braided lines.
In our opinion, all replaceable rubber lines should be replaced. That's why we sometimes offer the steel flex line kits with more lines than some of our esteemed competitors do. The YAMAHA Niken is an easy example to illustrate this:
The Niken and Niken-GT both have 8 rubber lines. However, 3 of them are not visible, but are located in front of the ABS module under the seat (or so....).
Some suppliers leave the non-visible lines as original rubber. As a result, the brake line set is then also cheaper in price than, for example, with us, if all lines are replaced.
Now you can discuss whether one or the other solution makes more sense or not. But that leads nowhere. Personally, I am convinced that every rubber line has to go if I want to achieve the optimum result with Stahlflex. But, everyone as he likes or thinks.
Here is an excerpt from the spare parts catalog (source: www.doublerparts.nl). There are already 6 lines at the front. You could easily reduce this to just 3 visible lines, but it makes no sense for us, as the rear 3 lines are also bolted in front of the ABS module. Sometimes they are firmly pressed into the rubber (quite often on Suzuki and Kawa), but not here.

It looks like this at the rear:

HEL Performance also offers and installs the connection blocks to fit. This means that HEL always crimps the hose directly onto the connection as far as possible. Some suppliers also supply an additional connection block. Sometimes even for an extra charge. This must then be installed between the metal line from/to the ABS and the actual hose. This doubles the number of sealing points/contact surfaces that have to be screwed together and sealed. Of course they do, provided that everything has been installed correctly and correctly by a professional.
At HEL we have these connection blocks, which I would say make the mechanic's life easier:

I hope that I have been able to help you with this. If you have any questions, please feel free to ask 
Topic, electrochemical corrosion.
The question of whether the different materials are "compatible" with each other is asked quite frequently.
Simple answer: yes, more than 20 years of practical experience with precisely these materials in use on the brake hose lines and their fittings/components has not revealed or raised any problems. Put your hand on it!
A detailed answer could* be as follows: There are, yes, but under certain conditions. However, these are not given in our case because:
- The mass ratios of ALU, stainless steel and copper are not such that a reaction occurs in this case.
- The sealing surfaces are pressed directly against each other. Neither oxygen nor water or salt etc. can get between them. The three substances mentioned would accelerate or promote corrosion. If everything is screwed together cleanly and properly, nothing will happen.
- This has been our practical experience for more than 20 years, from mopeds to high-performance motorsport.
- It is also used in automotive engineering.
etc.
If you wish, you can also use suitable aliminium or steel sealing rings instead of copper. We recommend copper sealing rings.
*could refers to the experience of HEL Performance. Chemists and physicists will certainly have a more technically correct answer. In this respect, we ask for your indulgence that we simply refer to our experience in many areas, from Moto-GP to simple mopeds or scooters.
Here too, the answer is quite clear: stainless steel banjo bolts & copper sealing rings are always included in the kit, if required* !
*"If required" means: a banjo bolt is only required for a connection with a ring eye (also known as a banjo because of its shape). We automatically include the appropriate banjo bolt/double banjo bolt and copper sealing rings. Of course, this is not necessary for connections that have an external or internal thread and therefore do not require a banjo bolt.
If we have accidentally and completely unintentionally included one screw too few, simply contact us in a friendly and polite manner. We will then be happy to send you another one.
Are the stainless steel connections and banjo bolts also available in color?
Yes, some of them are available, but only the 10 mm diameter ring connectors/banjo, and only in the normal/short version.
They are available in black, red, blue, gold, green and purple.
Unlike aluminium, for example, stainless steel cannot simply be anodized in color. That's why we at HEL Performance use an elaborate PU coating that is applied in several micro-layers and is therefore very robust. Like any coating, this also has its limits in terms of mechanical stress. In other words, hard and sharp-edged objects such as tools or stones (asphalt, gravel bed) will sooner or later damage or scratch the PU coating. The coating will then eventually flake off or simply no longer look nice. This is not a justified complaint or warranty case. As the coating would last almost forever without the mechanical impact.
For this reason, we do not offer colored banjo bolts. A key would immediately damage the coating.
The first choice and our recommendation for tough use on the racetrack is always stainless steel bright/silver. This stuff is so robust that even a wire brush could hardly do any damage. Nevertheless, please always approach the matter with caution and extreme care. The brake is one of the most important and sensitive components on the vehicle. It is not for nothing that many professional motorcycle racers and teams rely on the high quality of HEL Performance. True to our motto #RideTheBestYouCan #RideHEL
Trials are underway with so-called DLC (almost black) and TIN (gold look) coatings for banjo bolts. As the prices for such coatings are very high, we are still looking for inexpensive specialists who can realize this at an acceptable price. So please be patient, we will report.....
HEL Performance strives to offer a colorful range of colors.
The following colors are available*:
*Disclaimer: The color representation may vary slightly depending on the production batch. The colors in the sample photos may also differ depending on the screen of your device. We assume no liability for color deviations and exclude a general return due to color deviation. If the exact color is important to you, please ask us for a color sample of the current production batch.

Unfortunately, hose manufacturers sometimes have problems producing the desired colors.
For example, we can no longer find a manufacturer for a "neo yellow". Or a silver look.
In general, the colors of the PVC coating of the brake line hoses vary from batch to batch. This can probably never be completely avoided.
In this respect, the illustrations and examples in our store are for guidance only, but never show the actual color. Depending on the monitor or display, it will look slightly different every time, as I'm sure everyone knows. If in doubt, please request a color sample of the actual color from us in advance. There is no general right of exchange because the color is not to your liking or does not look exactly as it does on the monitor/display. Brake lines are only produced fresh for each order after receipt of the order. In exactly the color combination that was ordered. Therefore, a smooth exchange may be possible with additional payment. Please contact us, we are always interested in finding a solution together.
Current note: Tube color yellow has a nice bright color again. Even if it is not a real "neon yellow". But it looks really good again!

Silver look is no longer available!
The gold look color is available again!

Are you looking for replacement hoses/lines/kits for hydraulic operation of a convertible top?
HEL Performance in England manufactures and supplies them directly.
You will find an overview and ordering options on this website: https: //www.cabriolet-roof-hoses.com/
There you will also find answers to specific questions. Unfortunately, we cannot give you any more information than this.
The question "does part number HBFxxxx also fit the model with ABS" is easy to answer and quite clear to recognize.
Brake line kits for vehicles with ABS always explicitly state ABS in the designation/article name. If it does not say ABS anywhere, then it is for a motorcycle WITHOUT ABS.
The reason for this is that motorcycles did not have ABS in the beginning. The models with ABS were only added later. So from our point of view, it makes little sense to write on a motorcycle WITHOUT ABS that it is WITHOUT ABS.
Thesecond important feature is that HEL Performance only ever offers the ABS kits complete for the FRONT and REAR together. From our point of view, it is advisable to convert both brake circuits from rubber to braided steel on motorcycles with dual-circuit ABS brake systems. Never just one brake circuit. Mixed operation could cause problems in extreme situations. Who knows. To avoid this, we prefer to play it safe! True to our motto: #RideTheBestYouCan # RideHEL
The third feature is the price. At HEL Performance, you can roughly expect a sales price of around € 40.00 per steel flex line. Motorcycles with ABS usually always have at least 3 lines at the front and at least 2 at the rear. This means that 2-piece lines at the front and 1-piece lines at the rear may not be suitable.

Here you will find interesting and helpful documents to download: HEL PERFORMANCE
Overview of stainless steel fittings (drawings)
Overview of stainless steel fittings (pictures)
Fittings catalog
For custom-made multi-piece brake lines, please use the templates in this file (download)
HEL dimension sheets GMS - 2017
We are often asked how exactly the lengths should be measured.
So here is some information and tips.
The length of ring connections is measured from center to center of the connection.
The exception is 70° and 90° offset ring connectors, which are measured to the end (sealing surface)
A simple electric cable (3x1 or 3x1.5) is ideal for determining the cable route and required length. It can be laid in a similar way to a steel flex line.
Please note that the hose line (steel flex) must not have a minimum bending radius of less than 25 mm.
The PDF file "Overview of stainless steel fittings (drawings)" in the FAQ - HEL Performance section also provides more detailed information, as the measuring point on each fitting is indicated by a line through the ring. The same applies to the female and male thread connections.
http://www.gms-moto.eu/faq.htm
With motorsport greetings, your team from gms-moto.eu
From time to time, customers ask us what the different types of installation are all about: "as original", "alternative over the mudguard", "alternative full-length".
In principle, it's very simple. Original HEL Performance brake line kits are "almost" always supplied with all the necessary banjo bolts and sealing rings.
The term "all required" refers to the connections for which a banjo bolt is also required. No banjo bolt can be used for connections with their own thread (internal or external thread). Where there is no ring connection/banjo, there is no banjo bolt. Logical, isn't it!
"Almost always" means that there are brake calipers that are bled using a so-called bleeder banjo bolt. These bleeder banjo bolts are exceptionally NOT included in the kit, but can be ordered as an option. Or simply reuse the original breather banjo bolts. Sealing rings are always supplied in sufficient quantity for all banjo bolts.
As original :
All brake lines are supplied in such a way that they correspond 1:1 to the original lines and are easy to replace.
Alternatively Full-Length :
Our top seller! In this version, two lines are routed directly from the top of the handlebar/brake pump to the two brake callipers. One to the right, one to the left. That's all there is to it.
Alternatively over the mudguard:
Here, one line is routed from the top of the handlebar/brake pump down to a brake calliper at the front (usually to the right-hand calliper). The second line is then routed from one side to the other "over the mudguard", thus connecting both calipers to the brake pump.
Note: This variant does not necessarily have to be described as "alternative", as some vehicles already have this type of routing installed ex works. In these cases, it is then "as original".
We call it that anyway because it is easier for us. In future, however, we will endeavor to ensure that if the vehicle in question has an original installation method, it is also referred to as such.
For better identification and installation assistance, the supplied installation instructions explain which connection of the respective cable belongs where. The installation instructions can be found either on the last pages of the ABE or in the parts certificate.
Extract from the installation instructions:
The following identification of the individual lines in the packaging applies to all alternative brake line kits:
Blue plug: At the upper end of the line on the brake cylinder. This line leads to the right-hand brake calliper (in the direction of travel) (for version T also to the distributor)
Yellow plug: At the upper end of the line on the brake cylinder. This line leads to the left-hand brake calliper (in the direction of travel)
Red plug: At the end of the line that is routed over the mudguard. The end with the red plug is fitted to the right-hand brake calliper (in the direction of travel) (Fig. c)
Note: FR stands for Front / Vorn
K stands for complete set, front and rear
R stands for Rear
Rear brake lines are marked with two yellow marking rings.
Advantages/disadvantages:
The "over the mud guard" installation method may have a small disadvantage compared to the "full length" version.
The line that runs over the mudguard tends to collect any air that may arise in the brake callipers at the top of the bend. And it is difficult to get it out of there. This can usually only be remedied by removing a brake calliper and holding it up when bleeding.
The "Full-Lentgh" installation method originally comes from use on the racetrack, where it was probably developed for two main reasons:
(a) any air that may arise cannot collect anywhere, and must necessarily rise upwards.
b) 2 lines are cheaper than 3 lines, which were often installed ex works, especially in the past.
We think the "as original" installation method is self-explanatory. Everything is exactly the same as the original, but made of clean, heavy-duty steel flex hose material and with stainless steel connections and screws. Just premium steel flex from HEL Performance, the same quality from scooters to Moto GP bikes.
Our credo is: #WhatsStoppingYou?
Well, the question comes up regularly.
In which direction exactly does an RB or LB type connection point?
We would describe it like this: The connection points away from me, the ring eye/banjo tilts downwards, I can look through the connection. If the ring eye is now pointing to the right, it is RB, correspondingly to the left it is LB.
It looks like this:


Please feel free to contact us if you have any further questions.
With motorsport greetings, Team GMS-MOTO.eu
Technical data HEL Performance "Edel" steel fex brake hoses: a
| Hose inner material | PTFE |
|---|---|
| Hose outer material | 303/304 stainless steel & PVC protective coating |
| Material connections / material fittings | 303/304 stainless steel |
| Temperature range | -70°C to 260°C (-94°F to 500°F) |
| Inner diameter | 3.5mm (0.138") |
| Outer diameter | 7.5mm (0.295") |
| Maximum operating pressure | 290 Bar (4206 PSI) |
| Burst pressure | 870 Bar (12618 PSI) |
| Minimum bending radius | 38mm (1.496") |
| Line inner material | PTFE |
| Line outer material | Stainless steel (303/304) and protective PVC cover |
| Fittings material | Stainless steel (303/304) |
| Temperature range | -70°C to 260°C (-94°F to 500°F) |
| Inside diameter | 3.5mm (0.138") |
| Outside diameter | 7.5mm (0.295") |
| Maximum working pressure | 290 Bar (4206 PSI) |
| Burst pressure | 870 Bar (12618 PSI) |
| Minimum bend radius | 38mm (1.496") |
Recommended tightening torque for banjo bolts and threads M10x1.00, M10x1.25, M10x1.50, M12, 3/8 "x24UNF, 7/16" = max 32NM
Please note that this maximum tightening torque applies to HEL Performance stainless steel connections and threads. Please find out what maximum tightening torque the fittings and components on your vehicle can withstand. We accept no liability for damage caused by incorrect use. Always use tools and aids that are in perfect condition. Brake fluid is harmful to the skin, eyes and the environment. Observe the manufacturer's safety instructions.
We often receive questions about the best way to connect and use the thumb brake pump
Abbreviations/terms:
DBP: Thumb brake pump
BP: Brake pump (front or rear, axial or radial, doesn't matter)
BZ: Brake caliper
AB: Expansion tank
Basically, it can be done in different ways. Here are a few examples from practice:
a) Very simple, directly from the DBP to the BZ:
The rear BP is then not connected. The cable length and connections must be determined here, then it's a piece of cake
b) Use DBP and BP together. This works like this, for example:
a special adapter is fitted to the rear BP instead of the connection to the AB. The line from the DBP is then connected to this adapter. The rear pump and the DBP then use the AB of the DBP together. If you now press the thumb pump, the pressure is passed through the rear pump to the brake calliper. However, this only works as long as the rear pump itself is not depressed. This is because it then blocks the access (formerly the connection to the AB) with its piston and builds up pressure itself.
But first the thumb, and then the foot pump works..... (please send us your feedback from the field)
HEL Performance offers a special combi brake pump for rear brakes.
It has an additional connection for the steel flex brake line coming from the front: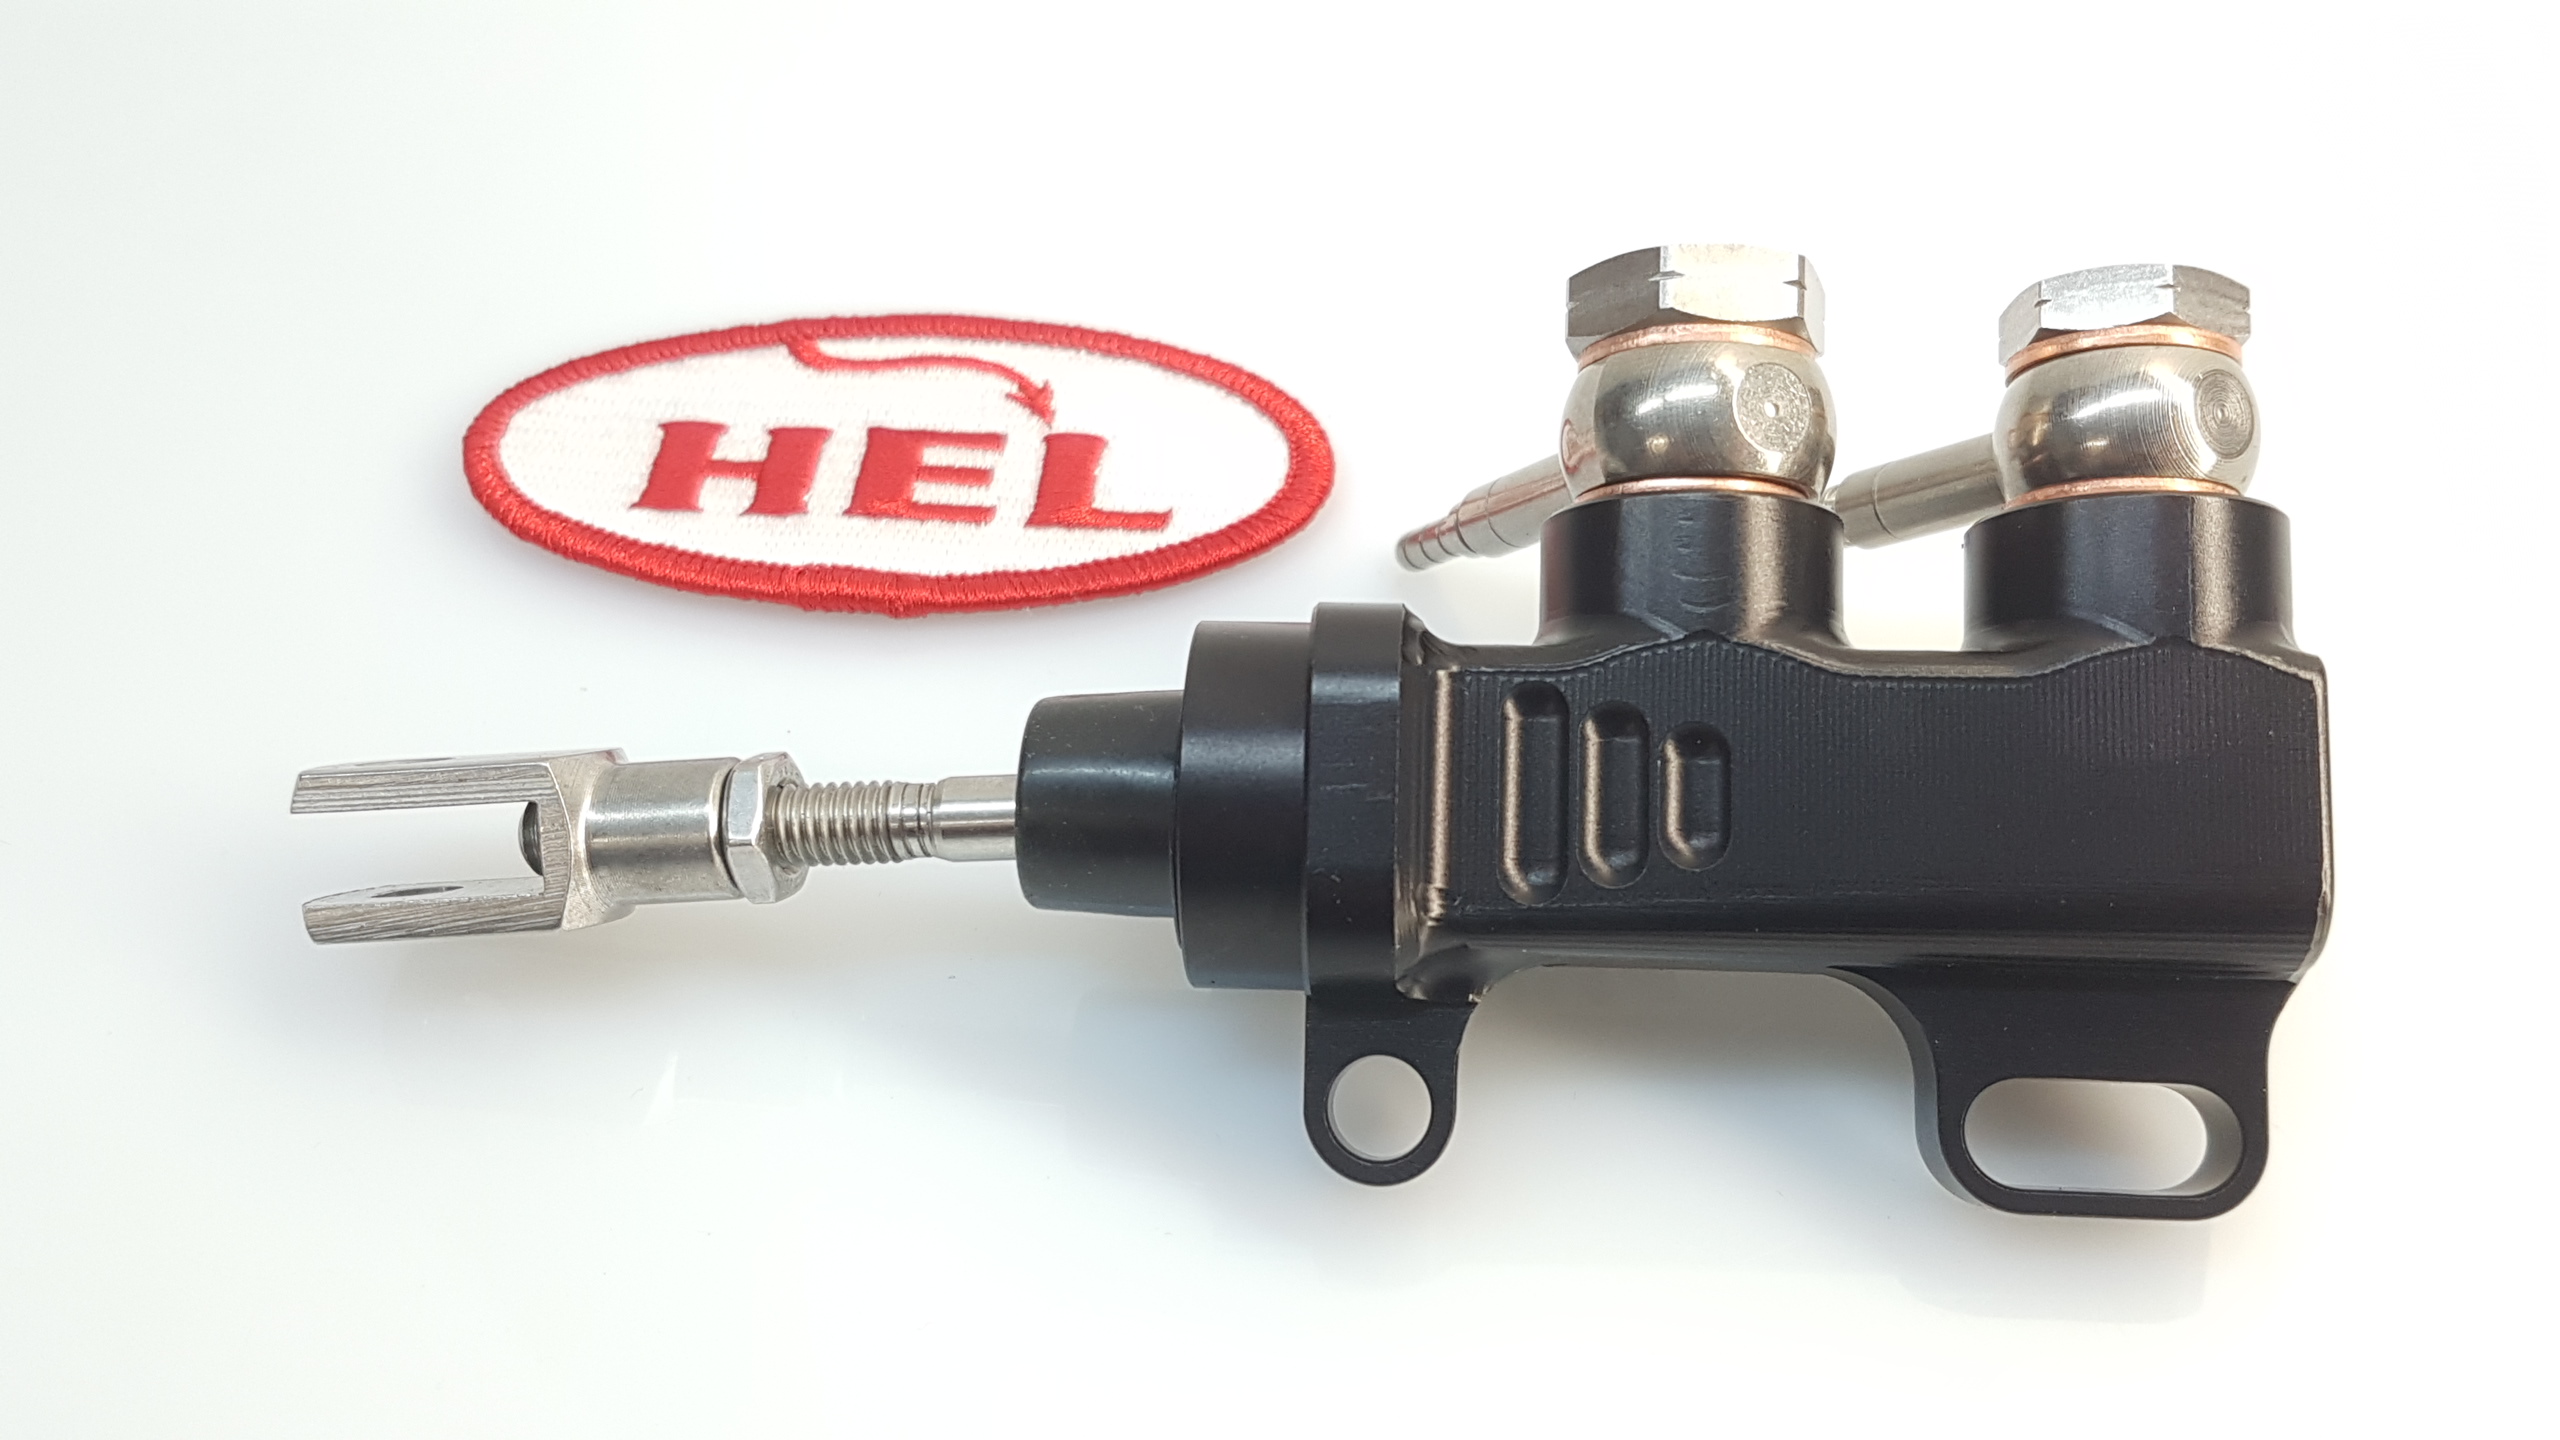
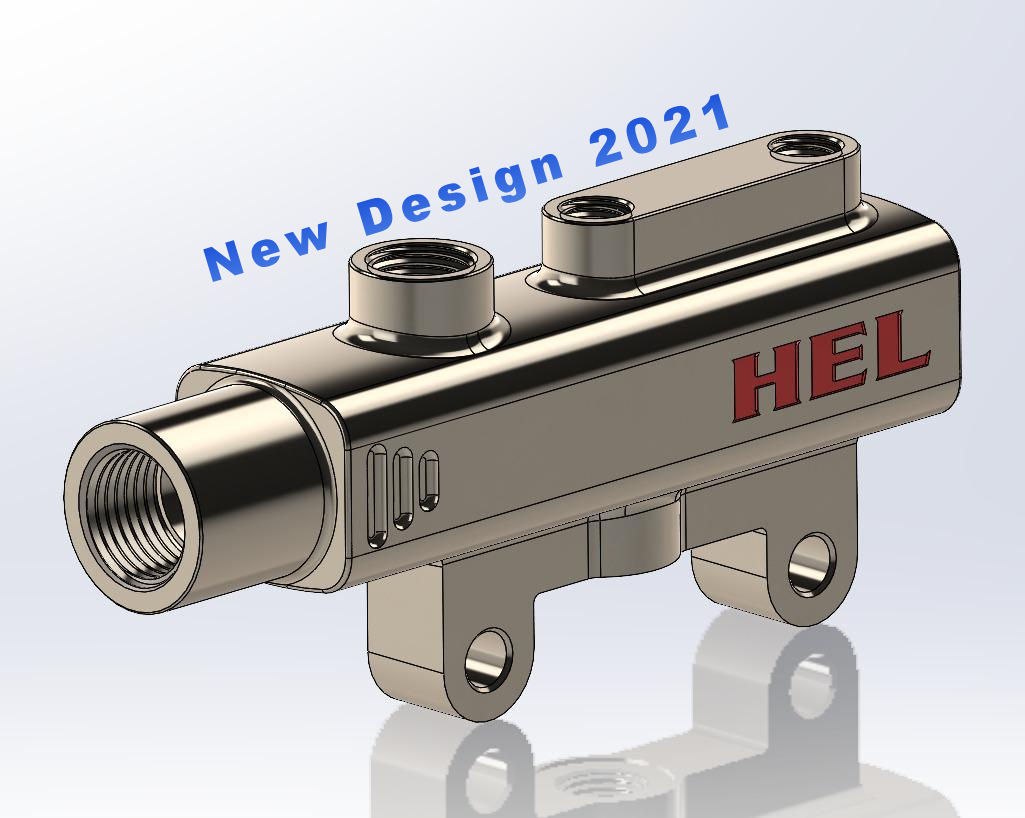
c) There is an accessory that has two inputs and one output. A kind of changeover valve.
Both pumps can be pressed independently of each other. The effect always goes to the FC. Both pumps have their own AB. We will be introducing this shortly.
HEL Performance offers radial brake pumps as well as thumb and finger brake pumps. (Finger brake pumps are also known as handlebar or scooter brake pumps).
The thumb brake pump from HEL Performance is currently available in two versions, but with the same piston size of 13mm.
- a) attached to the fork,
- b) attached to the handlebars
In contrast, HEL Performance offers the handlebar or finger or scooter brake pump (it has many names) in 3 piston sizes. The question then naturally arises as to which is the most suitable size for me and my motorcycle.
The answer to this is actually somewhat difficult. We know from practical experience from many race tracks and racing series around the world that there is no "general recipe". Nevertheless, it can be said that the finger brake pump in size 13mm always works in principle. Size 11 is used by more experienced (often also faster) riders, and size 10 is used more by very fast riders. No matter on which bike and whether man or woman.
This is just an observation from practice and has no binding value at all. We see a complete mix of different uses for this pump.
Personally, I think that the faster and more experienced riders seem to be on the road with less effort. So they have less to "fight" overall. Therefore, they achieve the same effect with less piston size and manual force on the lever as someone who puts in more effort. But this can also be wrong, unfortunately. As described above, it certainly seems to work.
We are often asked whether the brake line connections can be twisted.
The simple answer is: YES, they are, at any time, even back and forth, without causing a defect or leaking.
The reason for this lies in the ingenious design of the connections. The shaft of the fitting is cylindrical in shape, as is the press sleeve. This means that two surfaces made of the same material lie parallel to each other and form a good mechanical connection. Although they are pressed together, they can still be rotated. The tip of the fitting is enclosed by the PTFE inside the pipe. Three ring-shaped notches are turned into this tip. The PTFE presses into these notches when the compression takes place. This creates three "sealing rings" that never leak, even when the connection is twisted.
A bar in the press sleeve. The bar is pressed into a notch in the fitting and thus prevents the fitting from being pulled out of the hose.
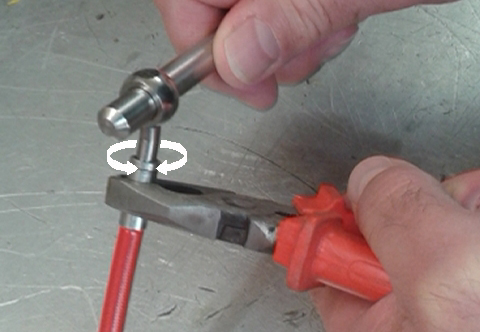
The best way to twist it is to use a suitable pin in the ring connection and hold it against the press sleeve with pliers.
The ring and the notch as well as the three small punctures in the tip are clearly visible in the picture below.

Why are there often two rear brake line kits for one model in the store? E.g. HBR7818 and HBR7819
The question is understandable and can easily lead to confusion.
At HEL Performance, there is a new part number for each kit if the front installation type changes.
S: Series/as original
F: Full length, directly from the top of the handlebars to the brake calliper(s)
O: Over the mudguard, one line from the top of the handlebars to one brake calliper, from there the second line "over the mudguard" to the other brake calliper
For every front brake line kit there is also a matching brake line kit for the rear wheel. Provided the motorcycle has a rear brake system with brake hoses


Legal notice:
HEL Performance grants a lifetime warranty on steel flex brake and clutch lines and kits.
The warranty covers fit and material defects and only becomes effective after online registration.
The information required for registration and the individual warranty registration number are enclosed with each line kit.
The statutory warranty rights remain in force and are not restricted by the warranty.


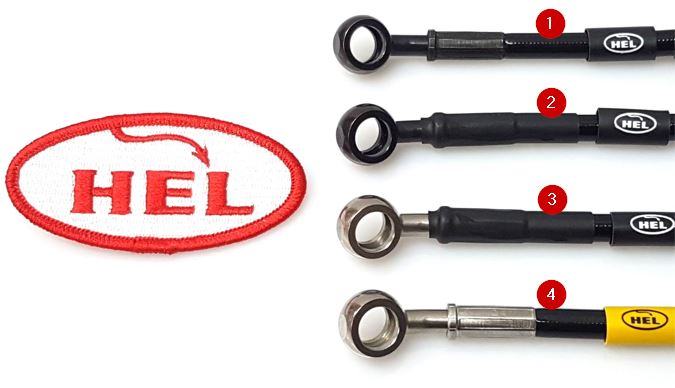
*The METAL-BLACK color is achieved by burnishing.
This question comes up again and again.
Which is better? Two lines from the ‘Master Cylinder’ to R+L to the brake calipers? (FULL LENGTH RACE)
Or would it be better to have one down and then a second from R to L via the mudguard? (OVER THE MUDGUARD)
Or with a T-piece (TEE), or even with a T-piece (TEE) and an additional 90° bend (ELBOW) = TEE-ELBOW ?
To be honest, this is basically a matter of taste and of course a question of cost. The more cables, the more expensive the pleasure.
And possibly the question of whether a double banjo bolt and two cables are desirable on the handlebars, or whether they are a nuisance or just look stupid. Or whether the double banjo bolt on the handlebars is already occupied by an additional line for the brake pressure sensor from the data recording.
If the lines are clean and properly installed, filled and bled, it probably doesn't matter in the end.
Some drivers theorise and claim that they can feel with the T-piece that the side with the overall longer line responds later than the other with the shorter line. Personally, I am convinced that it is possible to detect a difference purely by measurement. However small it may be. Only the pressure in the entire system always spreads spherically and evenly in all directions. In this case in the direction of the brake callipers.
Provided that all components are of 100% identical quality, operating temperature, wear and tear, and so on, this also works properly. All it takes is a single piston (out of 8 with 2 x 4-piston calipers at the front) that is a little sluggish, and bang, it feels as if the side is less responsive. Or one of 4 brake pads has not been manufactured in exactly the same way as the other 3 (sometimes different brake pad mixtures are deliberately combined in order to achieve a personally optimised braking feel) But what does this have to do with the line? Possibly nothing at all.
The TEE-ELBOW construction, also known as the h-construction, with a T-piece and then an additional 90° bend is now favoured by many riders and teams. This can be easily attached to the fork. The brake callipers then hang neatly on the cable R+L and do not ‘fly’ around freely.
I hope this helps a little. Other opinions are of course welcome.
Oh yes, the German manufacturer KALEX also uses this for its Moto-2 World Championship motorbikes. And they actually know what they're doing. From 2015 to 2022 from HEL Performance, after which they unfortunately had to change brands (political decision).
Here are a few photos of a brake line set with TEE-ELBOW and an additional connection for a brake pressure sensor in the cross line:


HEL GUARANTEE
Welcome to HEL Performance's Online Registration
HEL Performance was the first manufacturer ever to offer this online service, once again setting new standards.
By completing the required registration, customers residing outside the European Union (EU) receive a lifetime warranty* on all brake line kits.
For customers residing within the European Union (EU), the statutory warranty provisions remain fully valid!!
The following link will take you to the online registration page (in English only): www.helperformance.com/warranty
Our customers’ satisfaction is very important to us. We are delighted to have you as part of our team.
Please contact us immediately if you notice a problem with one of our products.
*The extended/lifetime warranty covers only material defects and fit. The statutory warranty provisions remain fully valid!!
HEL - ABE / parts certificate
Customers from Switzerland often ask whether the ABE from HEL Performance is valid there.
Basically: YES !!!
Here is the information from ASTRA:
Dear Mr. Gehrke
Thank you for your inquiry, which we can answer as follows:
In principle, the approval decision is the responsibility of the cantonal road traffic offices, which assess the individual case.
According to Article 34 paragraph 2 letter g VTS, modifications to the braking system must be reported and tested. In the present case, the question is to what extent an ABE in connection with the installation of steel flex brake lines is sufficient (equivalence with Swiss regulations) to enable the approval of individual vehicles or vehicle types on such a basis. We can comment on this as follows:
- A complete and correct declaration of suitability (ABE) is sufficient provided that the vehicle or vehicle type is included in the scope of application;
- In our opinion, the assessment of correct installation can be carried out by the expert;
- Under the above-mentioned conditions, conformity certification or assessment by an APS is not required.
We hope that this information is sufficient for you, otherwise we are at your disposal for further information.
Kind regards
XXXXX XXXXXXXXXXX
Federal Department of the Environment, Transport, Energy and Communications DETEC
Federal Roads Office FEDRO
Road Traffic Division
Vehicles Division
Postal address: 3003 Bern, location address: Weltpoststrasse 5, 3015 Bern
A customer recently gave us this feedback because he initially had problems with the registration office:
Text excerpt from his feedback:
Good morning Mr. Gehrke
I have now spoken to Mr. XXX from the Swiss Road Traffic Office again.
Mr. XXX's information is basically correct. However, there are three deposited test reports and an ABE with the assignment to the vehicle is sufficient. One of them is the ABE KBA 61360, so I can have the brake lines registered.
But the model designation should match the ABE.
I am relieved :-)
Kind regards and thank you for your clarifications and efforts
If you have any questions or problems with the registration office or the technical inspection, please feel free to contact us. We will try to help as best we can.
Since the current supplement 03 to the ABE, we have dispensed with the specification of the year of manufacture from-to in the areas of use.
The reason for this is that the year of manufacture would otherwise be a restrictive component of the ABE.
Example:
According to the manufacturer, a vehicle was only built from 2006 to 2007. In this case, the information 2006-2007 in the ABE would only apply to vehicles that were also registered for the first time in the two years 2006-2007. But not for the latecomer from 2008, which is why we have dispensed with the information in the ABE.
Sometimes less is more :-)
Customers contact us from time to time if, for example, they have purchased a used vehicle on which brake lines from HEL Performance have already been installed.
This can lead to the problem that they may not be permitted in Germany because the required markings are missing.
Unfortunately, these cannot be retrofitted as they are part of the manufacturing process.
How do you determine whether the cable has a marking valid for Germany?
The following markings must be stamped all around the stainless steel compression sleeve (the part to which the connector and hose are connected):
FMVSS, 106, type 1, year (2015, 2016 etc.), quarter (Q1, Q2, Q3 or Q4) HEL and an indication of the press with which the cable was manufactured (e.g. DE).
It then looks like this, for example:

However, the marking on the ferrule is only ONE of three necessary requirements for the cable to be legally used on motor vehicles on public roads in Germany.
The second necessary marking is an identification ring on the cable.
The identification ring is available in two versions:
a) if with ABE (general operating permit, issued by the Federal Motor Transport Authority) = HEL logo and KBA number 61360
b) if with parts certificate = HEL logo only
Figure identification ring a: with marking for ABE:

Picture identification ring b: with marking for parts certificate:

The third requirement is that your vehicle is listed in the area of application of the certificate. If not, you may be lucky and come across a knowledgeable test engineer who can find a comparable vehicle in the area of application and successfully carry out the installation approval for you. Simply asking the test center in a friendly manner often helps.
There is also an older parts certificate with a different marking. The variant only has HEL and a number stamped on the press sleeve. The identification ring is provided with information on vehicle key numbers and a Dekra certificate number.
If one of the details or markings is missing, the line unfortunately does not comply with either the parts certificate or the ABE.
HEL Performance provides the parts certificates and ABE in the download area of the website www.helperformance.de free of charge. A service that we believe is appropriate. At the bottom of the page you will find the section "Certificates"
If you have problems with "non-legal" lines, please contact us.
We can offer you replacement brake lines with valid markings at special prices.
(The offer also applies to steel flex lines from other manufacturers).
As already mentioned, the markings cannot be retrofitted. And yes, it's just a bureaucratic problem, but that's what it remains.
All original steel braided lines from HEL Performance are identical. Whether for a 50cc scooter or a MotoGP racer, the quality is always the same. Only the annoying marking is decisive in Germany, nothing else!
Your team from HEL Performance Germany - GMS Motorsport GmbH
We are often asked whether one or more lines in the brake line set can be made longer if required. And whether the lines are then also supplied with a valid ABE.
The extension is of course possible, and to a certain extent we can also do this at no extra cost.
However, the ABE is only valid for brake lines that are offered as replacements for the original brake line, as specified by the Federal Motor Transport Authority. And only for vehicles that a) were themselves brought onto the market with an ABE or EG-BE, and b) also correspond to the original condition (e.g. no conversions have been made that require longer lines)
The ABE is therefore only valid if the original wiring is replaced 1:1. And if the vehicle itself has an ABE/EG-BE. Vehicles that were brought onto the market with an EBE (individual operating permit) can use the ABE to have an installation approval and registration in the vehicle documents if they have the same model and type designation.
The so-called "alternative installation types" are an exception. As the manufacturer, we have also obtained an ABE for these.
Vehicles that have been put on the road with EBE can be identified quite easily. In the vehicle documents, the key numbers are either all with 00000 or only those for 2.2. And in the letter (part 2 of the vehicle documents) there is a corresponding entry about who imported/manufactured the vehicle.
If you would like an extension for the brake line, please contact us by email and include a corresponding note when ordering. If anything is still unclear, we will contact you automatically.
Steel flex lines for the hydraulic actuation of transmission clutches on vehicles make perfect sense.
On the one hand, it looks neat on the handlebars of a motorcycle if the same type of line is installed on both sides (for visual reasons).
On the other hand, there is also a need to optimize some clutch lines. For example, with very long clutch lines.
Why don't I get an ABE or a parts certificate as a customer? The answer is somewhat confusing, but simple.
!! Clutch lines are not approvable. This means that we as the manufacturer can neither apply for a parts certificate nor an ABE for them.
In general, products on vehicles can be divided into the following categories:
a) subject to approval
b) approvable and
c) not approvable.
This is merely an indication without guarantee, based on the information known to us. If you wish to obtain reliable legal information, please contact the Federal Motor Transport Authority in Flensburg.
Download service
Here you will find interesting and helpful documents to download:
HEL PERFORMANCE
Certificates / approvals
ABE HEL Performance (status 2021)
DEKRA parts certificate HEL Performance (status 2019)
Note: Download of ABE and parts certificate does not include area of application. If you subsequently require an ABE or a parts certificate WITH area of application for the HEL steel flex brake lines installed on your vehicle, please contact us with details/proof of when and where the lines were purchased.
You can also find more information about the different markings of the lines here.
Installation instructions and information on steel flex lines: Download
For custom-made multi-piece brake lines, please use the templates in this file:
HEL dimension sheets GMS - 2018
Illustrations of fittings, connections and accessories
Overview of stainless steel fittings (drawings)
Overview of stainless steel fittings (pictures)
Catalog Fittings-2020
Catalogs and flyers
Flyer 2 - Germany
GP-Chrono - Gear indicators
Usage list / Vehicle list GP-Chrono : Download
To view PDF files, you need the free Acrobat Reader, for example. You can download Acrobat Reader free of charge from the Adobe website. Download Acrobat Reader
Stäubli
Stäubli manufactures a large number of different quick disconnect couplings.
The SPH series is usually used in the brake sector. But there is also the CBR series. What are the differences?
SPH features:
2-pin locking
Common series for motorcycle brake systems, almost always made of aluminum.
Also available in stainless steel or titanium
Designation for PLUG and SOCKET exactly the opposite of the other Stäubli series.
Coupling = Socket, with 2 pins
Locking nipple = Plug, slotted
CBR features:
3-pin locking mechanism
Smaller design than SPH
Patented design
Made of TITAN as standard, a few products are also available in stainless steel.
Coupling = Socket, slotted
Locking nipple = plug, with 3 pins
Use:
Quick disconnect couplings (STK) for use with brake fluids are equipped with identical sealing materials (materials). In this case EPDM. Seals made of other materials are also available for other fluids and/or media. We will be happy to advise you, just ask!
Temperature resistance:
Different temperature resistance is usually determined by the material of the coupling itself. Aluminum, for example, changes its structure at 140°. This reduces the pressure stability. We therefore recommend not screwing aluminum clutches directly into the brake caliper.
The STK's that are often screwed in directly in Moto-GP, WSBK or EWC are usually made of TITANIUM, or at least stainless steel.
At HEL Performance, we have a few practical adapters for quick disconnect couplings in our program:
(a) with 10mm banjo and 3/8 "x24UNF internal thread, directly suitable for SPH and CBR series couplings with 3/8 "x24UNF, koisch sealing. Thanks to the stainless steel shaft, just like a normal banjo/fitting, this adapter can be cranked (top/bottom) as well as bent sideways. And of course in combination. For example: 0-90° downwards, and 0-90° sideways to the right or left.
HEL-STK-ADAPT


b) Fixed stainless steel adapter with 10 mm banjo and M10x1.00 internal thread. Nothing can be bent. Only a coupling with an M10x1.00 external thread will fit here. This adapter is also used as a 90° deflection, e.g. when converting to a HEL radial brake pump
HEL-RMC-ADAPT

SERVICE-Download brochures and price list
Brochure couplings series CBR DOWNLOAD-CBR
Brochure clutches SPH & Co. DOWNLOAD-SPH
Stäubli price list GMS Motorsport DOWNLOAD-price list
Oh dear, this question really comes up a lot. Yes, of course, Stäubli products are no bargain in terms of money.
But what are we talking about here?
With a good brake system, two fingers are enough to bring the vehicle safely to a standstill, even at speeds of over 300KMh. This generates various forces, pressures and temperatures (including in your pants when things get tight and your pupils dilate)
Who wants to create any uncertainty by installing an inexpensive quick-release clutch?
The "things" must:
a) be pressure-stable, always and under all braking system conditions
b) tight when connected and/or disconnected (no fluid out and no air into the brake system)
c) form a secure connection when plugged together. (do not open/decouple automatically)
d) resistant to common brake fluids (for use in the brake system, of course)
e) have a service partner in case of damage. Stäubli can also overhaul clutches. (However, we have never had to make use of this service).
There may be many different manufacturers and designs of quick disconnect couplings. Every manufacturer certainly does their best. Nevertheless, we will continue to rely on the original Stäubli brand for the time being. #SafetyFirst
HEL ABS kits photos
UTAG ICE
yes, the UTAG was developed precisely for such data. without a PC, laptop, notebook, subnotebook or similar device, it is of course not possible to read the data.
However, the UTAG can be engraved with some data from the outside. There are also other tags on which data can also be engraved.
According to emergency doctors I have consulted, determining the blood group is the least of the problems; in case of doubt, a blood reserve with a neutral blood group is always used for first aid. Everyone should be able to tolerate it.
However, data on allergies, intolerances etc. are important.
This helps as soon as you are in hospital.
Just as important are the contact details of relatives, employers, friends, etc., which are visible to everyone on the start screen of the software.
This screen is translated into the relevant language by clicking on the country symbol.
In principle, a piece of paper in your pocket will do, but who can find it?
The international symbol for medical data (cross and snake) is clearly marked on the UTAG. This is immediately recognized by paramedics and doctors.
Download the prosket by clicking here
If the PC does not respond when the UTAG is plugged in, please check the connection contacts on the UTAG.
One customer reported that the contacts were a little "steamed up". If this is the case, clean the contacts with a cloth and some oil, contact spray or similar. If nothing changes after this, please contact us.
If you are also looking for the factory-set password and cannot find it, please enter "password" and confirm. Please then replace the password with one of your own....
The USB memory space on the UTAG-ICE is approx.
- 125 MB for the "Card"
- 121 MB for the "Dogtag"
Approx. 1 MB of this is used for the included software.
Screenshot for CARD: 
Screenshot DOGTAG: 
UTAG is recognized as a drive and can also be used as such. Files can be copied to folders and/or deleted very easily using a file explorer.
Files stored in the "utgFiles" folder can be easily encrypted in the UTAG software.
Screenshot of the UTAG folder view:
UTAG-Dogtag and UTAG-Card are supplied in protection class IP57 (according to UTAG England).
The devices were tested in normal tap water at a depth of 1m for 1 hour. Afterwards, all devices functioned perfectly.
For safety reasons, we would like to point out that the devices must not be used in salt water or water containing chlorine. The contacts of the USB connection would corrode or be damaged.
When bathing or swimming in chlorinated water (swimming pools, outdoor pools, pool) or salt water, it is recommended to carry the UTAG in a suitable box (e.g. cell phone safe or similar). The same applies to the shower or bathtub. Soapy water or other bath additives can also damage the contacts.
UTAG is currently investigating whether we will soon be able to offer a suitable housing or similar.
If you would like to stay informed about UTAG, please
request product information or
ask us a question directly.
If you have any further questions about UTAG or other GMS Motorsport products, please use our contact form. We will be happy to answer your questions.
GP-Crono
A connection diagram is supplied with the device.
In a nutshell, however, you only need the following connections:
a) 12 volt plus and minus (don't forget the fuse)
b) Speed signal
c) Speed signal
The speed signal can be determined either directly from the ignition system/CDI unit, the ignition coil (primary voltage) or by wrapping the high-voltage cable (ignition cable) as an inductive signal.
The speed signal must be generated by a Hall sensor (see also FAQ: Do I need a Hall sensor)
The instruments from GP-Crono are "universal instruments"!
On the one hand this has the advantage that no adapters are needed for certain vehicles, on the other hand the disadvantage that a few cables have to be connected directly to the cables on the vehicle.
Please download the current GP-Crono connection list.
There you will find the corresponding cable colors on the vehicle.
In the far right column you will find additional information for vehicles where the signals sometimes cannot be removed from the cockpit.
For example, as with the HONDA VTR1000 SP2. Here, the orange cable of the gear indicator must be connected to the rear ignition coil of the vehicle, to the black/yellow cable (BK-Y).
The GP-Crono gear display calculates a factor from the incoming speed signal and engine speed signal at lightning speed. This requires clearly defined, preferably digital information.
As a rule, the engine speed is not a problem; you get it from the ignition system. No matter where, spark plug, CDI etc.
The speed signal must be supplied by a Hall sensor. Either the vehicle already has its own, which you can then use in almost all cases. Or you have to retrofit a Hall sensor.
Hall sensors react to ferrometallic objects (screw heads, rivets, etc.) when these are moved past the sensor at a short distance.
The magnetic field generated by the sensor is disturbed by the metal object. If the disturbance is strong enough, the sensor changes the digital output value from 0 to 1 (or from 1 to 0, depending on the sensor). The Ganag display can then calculate this.
The idle indicator is shown by a horizontal bar in the display.
During programming, the gear indicator determines a factor for each gear from the ratio of "engine speed to wheel speed"
If it does not find a suitable match, it assumes idling.
TIP: The more accurately the programming is carried out, the faster and, above all, the more precisely the gears and idling are displayed.
Example:
| Gear | RPM | Impulse wheel sensor | Factor |
| 1 | 2000 | 150 | 13,3333 |
| 2 | 2000 | 220 | 9,0909 |
| 3 | 2000 | 350 | 5,7143 |
| 4 | 2000 | 476 | 4,2017 |
| 5 | 2000 | 530 | 3,7736 |
| 6 | 2000 | 680 | 2,9412 |
Before programming, please check whether the connections also provide the necessary or correct values as described below. Otherwise it will not work.
1) Check whether the speed signal is being received:
- Switch on the ignition
- Q bar in the display flashes
- Turn rear wheel (generate signal at Hall sensor)
- Crossbar no longer flashes
- Speed signal correctly detected
If the crossbar flashes even though you are turning the wheel, the signal is not correct.
Possible error:
- Check the wiring
- Check whether the Hall sensor is supplied with 12-volt voltage
2) Now start programming according to the instructions. If the gear indicator cannot be programmed, the signal for the engine speed is not correct.
- Check cables and connections.
Note: Only one cable may be connected for the speed signal. Never connect both.
These instructions are provided without any guarantee or liability for damage of any kind.
Once all signals have been received correctly, you can now program the instrument.
Please observe the relevant warnings and safety instructions!
(And also use your own common sense).
Nobody should come to any harm. Neither man nor machine, please.
We usually do this as described below:
Variant A)
The vehicle can be jacked up on an assembly stand and the signals are recognized.
1 ) As already described in the instructions, please look for an engine speed at which the engine runs smoothly,
at which the engine runs smoothly. (no fluctuations, misfires or similar).
We prefer the engine speed to be as low as possible (1500-3000 rpm) so that the wheel does not turn so quickly in last gear. This is safer.....
2 ) Now support the hand with which the throttle is operated so that the engine speed no longer changes.
no longer changes from now on. (e.g. support the brake lever with two fingers)
3 ) Activate the programming with the green cable of the gear indicator (PROG GEAR, gear 1 flashes)
4 ) Pull the clutch, engage first gear, let the clutch come in sensitively. (Do not change the throttle)
5 ) Wait until the gear indicator jumps to 2nd gear and 2 flashes
6 ) Pull the clutch briefly, engage second gear, release the clutch.
7 ) Similarly with all gears up to the last gear.
8 ) When the last gear has been programmed and the next one flashes (e.g. 7th gear), pull the clutch, reduce the engine speed to idle, brake the rear wheel gently with the rear brake until it comes to a standstill.
Congratulations, you should now have successfully programmed the gears.
Varainte B)
The vehicle cannot be jacked up.
The programming must be carried out while driving.
It is essential to use protective clothing and equipment (helmet, gloves etc. in accordance with the German Road Traffic Regulations).
In principle, the programming in this case is exactly the same as in variant A.
The only disadvantage is that you also have to concentrate on the programming while driving.
We recommend finding a quiet road with little traffic and programming there.
Pay attention to yourself and other road users. Safety first !!!!!
A good alternative, if the Hall sensor/signal transmitter sends its signal to the rear wheel or from the drive unit (e.g. the sprocket), is to find a dealer who has a dynamometer. Ask him whether the programming can be carried out on the test bench (without power measurement). Then proceed as for variant A.
This is safer and also works better than while driving. It is much safer and more precise to achieve the correct engine speed on the test bench. (Don't forget the dealer's coffee box)
With this variant B, it is very important that the selected engine speed can be reached as quickly as possible in each gear and that it is kept there cleanly until the end of the respective gear programming. If this does not work, the display will probably be inaccurate later on and may also display incorrectly.
At the end of programming, pull the clutch as described and accelerate (to idle) and brake gently in the last gear to a standstill.
Then, if desired, program the LEDs as follows.
1 ) Increase engine speed to approx. 4,000 rpm and hold.
2 ) With the green cable to ground until "PROG LED" appears in the display and flashes
3 ) Continue to hold the engine speed at 4,000 rpm until the "PROG LED" no longer flashes.
4 ) Now increase the engine speed to the desired "shift flash speed" and return to idle.
5 ) Wait until the display shows "OK".
6 ) That's it. The display switches back to normal mode.
Video on YouTube: To the video GEAR01
Note: This is how the LEDs work:
As an example, let's assume that the gearshift speed has been programmed at 12,000 rpm.
Then the LEDs light up as follows:
at 12,000 rpm = all 5 LEDs flash
at 11,500 rpm = all 5 LEDs light up
at 11,000 rpm = only the 4 LEDs on the left light up
at 10,500 U = only the 3 LEDs on the left light up
at 10,000 U = only the 2 left LEDs light up
at 9,500 U = only the left-hand LED lights up


